Quantcast
Channel: Sumit, Author at STechGuide
Viewing all 2823 articles
Browse latest View live

Download Huawei P8 Lite B602/B603 Marshmallow Firmware (Europe)

$
0
0

Latest Huawei P8 Lite B602/B603 Marshmallow Firmware starts rolling out for Single and Dual SIM. The update improves system security with Google security patches and still based on Android 6.0 Marshmallow. If you want to flash stock B602/B603 on Huawei P8 Lite, then you are in right place. Here we provide you the Official Huawei P8 Lite B602/B603 Stock Marshmallow Firmware for European variant ALE-L21. Download Huawei P8 Lite B602/B603 Marshmallow Firmware (Europe) from below.

The Huawei P8 Lite features a 5.0 inch HD display with a resolution of with 720 x 1280 pixels. The phone powered by an Octa-core 1.2 GHz HiSilicon Kirin 620 processor with 2GB of RAM. You can Download Huawei P8 Lite B602/B603 Marshmallow Firmware update from below which has a build number ALE-L21C432B602/B603.

Download Huawei P8 Lite B602/B603 Marshmallow Firmware (Europe)

Firmware Information –

  • Device – Huawei P8 Lite (Single Sim/Dual SIM)
  • Model – ALE-L21
  • Android Version – 6.0
  • EMUI Version – 4.0
  • Firmware – B602/B603
  • Build Number –ALE-L21C432B602/ALE-L21C432B603
  • Region – Europe
  • Status – Official
  • Type – Full firmware image
  • What’s New – Changelogs

Note:-

  • This Firmware file is only for Huawei P8 Lite ALE-L21 variant. Don’t try this on any other device.
  • Your device must be on stock firmware and stock recovery.
  • Follow the steps correctly otherwise you may brick your device.
  • We are not responsible for any damage to your phone.
  • It may erase your data so it is advisable to take a complete backup of your phone for safer side.
  • Ensure that your phone has at least 50-60% charged to prevent the accidental shutdown in-between the process.

Download Huawei P8 Lite B602/B603 Marshmallow Firmware

Download Huawei P8 Lite Dual SIM B602 Update

Download Huawei P8 Lite Single SIM B603 Update

How to install Stock B602/B603 Update on Huawei P8 Lite –

Method 1

1) First, download B602/B603 OTA Update for Huawei P8 Lite from above and extract it.

2) Now create a folder dload in the root of your SD card and place the update.app file in that folder.

3) Now dial *#*#2846579#*#* from your phone dialer to open a hidden menu.

4) Now click on Project Menu -> Software Upgrade -> SDCard Upgrade.

5) Now select and run the update.

6) Wait until the installation process is complete and then reboot your device.

7) Done.

Method 2

1) Download B602/B603 update for Huawei P8 Lite from above and extract it.

2) Now create a folder dload in the root of your SD card and place the update.app file in that folder.

3) Now turn off your device.

4) Now press “Volume Up + Volume Down and Power Button” together. The update process will start automatically.

5) Now wait for some time to complete the process.

6) Done.

Download Huawei P8 Lite B602/B603 Marshmallow Firmware and share it with your friends. If you have any questions comment below.

The post Download Huawei P8 Lite B602/B603 Marshmallow Firmware (Europe) appeared first on STechGuide.


Download Huawei P8 Lite B506 Marshmallow Update (Latin America)

$
0
0

Latest Huawei P8 Lite B506 Marshmallow Firmware for ALE-L23 in Chile Latin America is now available for download. The ROM packs with the latest Android 6.0 Marshmallow firmware which is based on the latest EMUI 4.0 OS. If you want to flash the stock B506 firmware on ALE-L23 Huawei P8 Lite, then you are in right place. Here we provide you the Official Huawei P8 Lite B506 Update for Latin American variant ALE-L23. Download Huawei P8 Lite B506 Marshmallow Update from below.

The Huawei P8 Lite features a 5.0 inch HD display with a resolution of with 720 x 1280 pixels. The phone powered by an Octa-core 1.2 GHz HiSilicon Kirin 620 processor with 2GB of RAM. Huawei P8 Lite has 16GB of internal storage which is expandable up to 256GB via a microSD card. You can Download Huawei P8 Lite B506 Marshmallow Update from below which is 1.6GB in size and has a build number ALE-L23C521B506.

Download Huawei P8 Lite B506 Marshmallow Update (Latin America)

Firmware Information –

  • Device – Huawei P8 Lite
  • Model – ALE-L23
  • Android Version – 6.0
  • EMUI Version – 4.x
  • Firmware – B506
  • Build Number – ALE-L23C521B506CUSTC521D001
  • Region – Latin America
  • Country – Chile
  • Status – Official
  • Type – Full firmware image
  • What’s New – Changelogs

Note:-

  • This Firmware file is only for Huawei P8 Lite ALE-L23 variant. Don’t try this on any other device.
  • Your device must be on stock firmware and stock recovery.
  • Follow the steps correctly otherwise you may brick your device.
  • We are not responsible for any damage to your phone.
  • It may erase your data so it is advisable to take a complete backup of your phone for safer side.
  • Ensure that your phone has at least 50-60% charged to prevent the accidental shutdown in-between the process.

Download Huawei P8 Lite B506 Marshmallow Update Files

Download B506 OTA Zip for Huawei P8 Lite ALE-L23C521B506

How to install Stock B506 Update on Huawei P8 Lite –

Method 1

1) First, download B506 ROM for Huawei P8 Lite from above and extract it.

2) Now create a folder dload in the root of your SD card and place the update.app file in that folder.

3) Now dial *#*#2846579#*#* from your phone dialer to open a hidden menu.

4) Now click on Project Menu -> Software Upgrade -> SDCard Upgrade.

5) Now select and run the update.

6) Wait until the installation process is complete and then reboot your device.

7) Done.

Method 2

1) Download B506 update for Huawei P8 Lite from above and extract it.

2) Now create a folder dload in the root of your SD card and place the update.app file in that folder.

3) Now turn off your device.

4) Now press “Volume Up + Volume Down and Power Button” together. The update process will start automatically.

5) Now wait for some time to complete the process.

6) Done.

Download Huawei P8 Lite B506 Marshmallow Update and share it with your friends. If you have any questions comment below.

The post Download Huawei P8 Lite B506 Marshmallow Update (Latin America) appeared first on STechGuide.

Download Huawei P8 B398 Marshmallow Update [Europe]

$
0
0

Latest B398 Update for Huawei P8 starts rolling out. The update improves system security with Google security patches and packs with the latest Android 6.0.1 Marshmallow firmware which is based on the latest EMUI 4.0.1 OS. Earlier we posted the B387 update for Huawei P8 and today we provide you the Official Huawei P8 B398 Marshmallow Update for European GRA-L09 and GRA-UL10 variants. If you want to Install B398 Update on Huawei P8, then you are in right place. Here we provide you the Official Huawei P8 B398 Marshmallow Update files.

Huawei P8 features a 5.2 inches display with a resolution of 1080 x 1920 and a pixel density of 424ppi. Huawei P8 powered by Octa core HiSilicon Kirin 930/935 processor with 3GB of RAM and 16/64GB internal storage. Now you can download the latest B398 OTA for Huawei P8. You can Download and Install B398 Update on Huawei P8 from below which has a build number GRA-L09C432B398.

Download Huawei P8 B398 Marshmallow Update [Europe]

Firmware Information –

  • Device – Huawei P8
  • Model – GRA-L09/GRA-UL10
  • Android Version – 6.0
  • EMUI Version – 4.0
  • Firmware – B398
  • Build Number – GRA-L09C432B398/GRA-UL10C432B398
  • Region – Europe
  • Status – Official
  • Type – Full firmware image
  • What’s New – Changelogs

Note:-

  • This Firmware file is only for Huawei P8 GRA-L09/GRA-UL10 Europe. Don’t try this on any other device.
  • Your device must be on stock firmware and stock recovery.
  • Follow the steps correctly otherwise you may brick your device.
  • We are not responsible for any damage to your phone.
  • It may erase your data so it is advisable to take a complete backup of your phone for safer side.
  • Ensure that your phone has at least 50-60% charged to prevent the accidental shutdown in-between the process.

Download Huawei P8 B398 Marshmallow Update File

Download B398 update for GRA-L09 Huawei P8

Download B398 update for GRA-UL10 Huawei P8

How to Install B398 Update on Huawei P8 –

Method 1

1) First, download Full B398 ROM for Huawei P8 from above and extract it.

2) Now create a folder dload in the root of your SD card and place the update.app file in that folder.

3) Now dial *#*#2846579#*#* from your phone dialer to open a hidden menu.

4) Now click on Project Menu -> Software Upgrade -> SDCard Upgrade.

5) Now select and run the update.

6) Wait until the installation process is complete and then reboot your device.

7) Done.

Method 2

1) Download Stock B398 update for Huawei P8 from above and extract it.

2) Now create a folder dload in the root of your SD card and place the update.app file in that folder.

3) Now turn off your device.

4) Now press “Volume Up + Volume Down and Power Button” together. The update process will start automatically.

5) Now wait for some time to complete the process.

6) Done.

Download and Install Huawei P8 B398 Marshmallow Update and share it with your friends. If you have any questions comment below.

The post Download Huawei P8 B398 Marshmallow Update [Europe] appeared first on STechGuide.

Install B372 Marshmallow Update on Huawei P8 [Latin America][Asia]

$
0
0

Now you can Download and Install B372 Marshmallow Update on Huawei P8. The update improves system security with Google security patches and packs with the latest Android 6.0.1 Marshmallow firmware which is based on the latest EMUI 4.0.1 OS. The update is rolling out via OTA, and soon you will receive the update. But if you want to flash stock B372 Update on Huawei P8 manually then you are in the right place here we provide you the Official Huawei P8 B372 Software Update for Asia and Latin America. Follow below guide to Install B372 Marshmallow Update on Huawei P8.

Huawei P8 features a 5.2 inches display with a resolution of 1080 x 1920 and a pixel density of 424ppi. Huawei P8 powered by Octa core HiSilicon Kirin 930/935 processor with 3GB of RAM and 16/64GB internal storage. Now you can download and Install B372 Marshmallow Update on Huawei P8. You can Download Huawei P8 B372 Update from below

Install B372 Marshmallow Update on Huawei P8 [Latin America][Asia]

Firmware Information –

  • Device – Huawei P8
  • Model – GRA-UL00/GRA-UL10
  • Android Version – 6.0.1
  • EMUI Version – 4.0.1
  • Firmware – B372
  • Build Number – GRA-ULxxCxxB372
  • Status – Official
  • Type – Full/OTA firmware image
  • What’s New – Changelog

Note:-

  • This Firmware file is only for Huawei P8 Asia/Latin America. Don’t try this on any other device.
  • Your device must be on stock firmware and stock recovery.
  • Follow the steps correctly otherwise you may brick your device.
  • We are not responsible for any damage to your phone.
  • It may erase your data so it is advisable to take a complete backup of your phone for safer side.
  • Ensure that your phone has at least 50-60% charged to prevent the accidental shutdown in-between the process.

Download Huawei P8 B372 Marshmallow Update

  • Huawei P8 B372 update for Asia GRA-UL00/GRA-UL10 – Download
  • Huawei P8 B371 update for Latin America GRA-L09 (GRA-L09C605B372) – Download
  • Huawei P8 B372 update for latin America GRA-UL00 (GRA-UL00C605B372) – Download

How to Install B372 Marshmallow Update on Huawei P8 –

For Full ROM

Method 1

1) First, download Full B372 ROM for Huawei P8 from above and extract it.

2) Now create a folder dload in the root of your SD card and place the update.app file in that folder.

3) Now dial *#*#2846579#*#* from your phone dialer to open a hidden menu.

4) Now click on Project Menu -> Software Upgrade -> SDCard Upgrade.

5) Now select and run the update.

6) Wait until the installation process is complete and then reboot your device.

7) Done.

Method 2

1) Download B372 Update for Huawei P8 from above and extract it.

2) Now create a folder dload in the root of your SD card and place the update.app file in that folder.

3) Now turn off your device.

4) Now press “Volume Up + Volume Down and Power Button” together. The update process will start automatically.

5) Now wait for some time to complete the process.

6) Done.

Download and Install B372 Marshmallow Update on Huawei P8 and share it with your friends. If you have any questions comment below.

The post Install B372 Marshmallow Update on Huawei P8 [Latin America][Asia] appeared first on STechGuide.

Download ZTE Axon 7 Mini Android 7.1.1 Nougat Update (B12)

$
0
0

Now you can update ZTE Axon 7 Mini to Android 7.1.1 Nougat by installing the latest B12 update on Axon 7. The B12 update for ZTE Axon 7 Mini brings multi-window, updated emojis, dual-language support, and new support for T-Mobile’s Wi-Fi calling and is based on Android 7.1.1. The update is rolling out via OTA and will be available for all in next 48 hours. You can wait for the OTA or Download ZTE Axon 7 Mini Android 7.1.1 Nougat Update to update it manually.

The company previously rolled out the Nougat update for European Axon 7 and now latest Nougat based B12 update for ZTE Axon 7 Mini starts rolling out. ZTE Axon 7 Mini Android 7.1.1 Nougat Update rolled out via OTA for the B2017G variant. The official Android 7.1.1 Nougat for ZTE Axon 7 Mini is a stable build and rolling via OTA, but you can also Update ZTE Axon 7 Mini to Android 7.1.1 Nougat Manually. You can wait for the OTA updates, or ZTE Axon 7 Mini Android 7.1 Nougat Firmware Update to Update ZTE Axon 7 Mini to Nougat manually.

Download ZTE Axon 7 Mini Android 7.1.1 Nougat Update (B12)

ZTE Axon 7 Mini features 5.2 inches FHD display with a resolution of with 1080 x 1920 pixels. The ZTE Axon 7 powered by Qualcomm Snapdragon 617 with 3GB of RAM. The phone has 32GB of internal storage which is expandable up to 256GB via a microSD card. You can check below guide to Install Android 7.1.1 Nougat on ZTE Axon 7 Mini.

ZTE Axon 7 Mini Android 7.1.1 Features and Changelogs –

  • Android 7.1.1 provides updated emojis, plus the ability to use two or more languages at once. Communicating is now easier (and more fun) than ever.
  • Not only can you text in two languages, but you can “be in two places” at once! Android N gives you the ability to switch between apps or run them side-by-side. How fast can you multitask?
  • Android N also provides the ability to save even more battery power, revamped notification updates and a whole lot more so you can customize the Axon 7 Mini even more.
  • With T-Mobile Wi-Fi Calling support you can now talk and text without using data!

Firmware Information –

  • Device – ZTE Axon 7
  • Model – A2017G
  • Android Version – 7.1.1
  • Firmware – B12
  • Region – Europe
  • Build Number – B2017GV1.0.0B12
  • Status – OTA + Official SD Card Package
  • Size – 2.1GB

Note:-

  • This Firmware file is only for ZTE Axon 7 Mini B2017G (Europe). Don’t try this on any other device.
  • Your device must be on stock firmware and stock recovery.
  • Follow the steps correctly otherwise you may brick your device.
  • We are not responsible for any damage to your phone.
  • It may erase your data so it is advisable to take a complete backup of your phone for safer side.
  • Ensure that your phone has at least 50-60% charged to prevent the accidental shutdown in-between the process.

Download ZTE Axon 7 Mini Android 7.1.1 Nougat Update

Download ZTE Axon 7 Mini B12 Full OTA

How to Update ZTE Axon 7 Mini to Android 7.1.1 Nougat Manually –

Method 1 

  1. First, download the Axon 7 Mini B12 OTA zip from above and rename it to update.zip.
  2. Copy the update.zip to the root of the SD Card.
  3. Now go to phone settings -> updates.
  4. Software Update app will automatically recognize the zip file.
  5. Just tap the file to Install Nougat B13 on Chinese Axon 7.

Method 2

  1. First, download the Axon 7 B12 Nougat zip from above and rename it to update.zip.
  2. Now enable ‘USB debugging’ and ‘OEM Unlock’ option from setting>developer option>. To enable Developer Options, go to About phone and tap the Build Number 7 times.
  3. Now Boot your device into Recovery mode by turn off your device and then Press and Hold Volume UP & Power button.
  4. Now select “Apply update via SDcard”.
  5. Now select the zip file and wait until the process complete.
  6. Reboot and Done.

So Download ZTE Axon 7 Mini Android 7.1.1 Nougat Update and Update your ZTE Axon 7 Mini to Android Nougat Manually. If you have any related queries, comment below. Stay connected with us via Facebook, Twitter, and Google Plus to read more such helpful posts.

Source

The post Download ZTE Axon 7 Mini Android 7.1.1 Nougat Update (B12) appeared first on STechGuide.

Download Honor 8 B384 Android Nougat Update [Russia]

$
0
0

Here we share the direct link to Download Honor 8 B384 Android Nougat Update for Russian Variant. Recently we share B388 Nougat update for Honor 8 and company release one more update today B384. The update optimizes power consumption, increases HiVoice’s voice recognition speed, and integrates Google security patches. If you want to Install B384 update on Honor 8, then you are in the right place. Here we provide you the Official Honor 8 B384 Nougat Update for FRD-L09.

Honor 8 features 5.2 inches FHD display with a resolution of with 1080 x 1920 pixels. The Honor 8 powered by an Octa-core HiSilicon Kirin 950 with 4GB of RAM. The phone has 32/64GB of internal storage which is expandable up to 256GB via a microSD card. Android Nougat update for USA Honor 8 was already available and now one more Honor 8 B384 Android Nougat update is now available. Download Honor 8 B384 Nougat Firmware Update from below.

Download Honor 8 B384 Android Nougat Update [Russia]

Firmware Information –

  • Device – Honor 8
  • Model – FRD-L09
  • Android Version – 7.0
  • EMUI Version – 5.0
  • Firmware – B384
  • Build Number – FRD-L09C10B384
  • Region  Russia
  • Status – Official
  • Type – Full firmware image
  • What’s New – Changelog

Note:-

  • This Firmware file is only for Honor 8 FRD-L09. Don’t try this on any other device.
  • Follow the steps correctly otherwise you may brick your device.
  • We are not responsible for any damage to your phone.
  • It may erase your data, so it is advisable to take a complete backup of your phone for safer side.
  • Ensure that your phone has at least 50-60% charged to prevent the accidental shutdown in-between the process.

Download Honor 8 B384 Android Nougat Update Files

1) Download Nougat Update for Russian Honor 8 (FRD-L09C10B384) –

How to install B384 Nougat Firmware on Honor 8 –

1) First, you need to unlock the bootloader of Honor 8 and download and install a custom recovery. If you already had an unlocked bootloader and custom recovery installed on your device then skip this step.

2) Download Honor 8 B384 Nougat ROM from above and save it on your device.

3) Now Boot your device into TWRP Recovery mode.

5) In TWRP first flash the update.zip file and once done without rebooting your device move to the next step.

6) Now flash the update_full_FRD-Lxx_hw_eu.zip and update_data_full_public.zip files.

7) wait until the process finish.

8) Done! Reboot your device and enjoy.

Download and Install Honor 8 B384 Nougat Update and flash it manually. If you have any questions comment below.

The post Download Honor 8 B384 Android Nougat Update [Russia] appeared first on STechGuide.

Download MediaPad M3 B350 Nougat Update [USA][Middle East]

$
0
0

Latest B350 Nougat Update for the USA MediaPad M3 is now available for download. Earlier we post Nougat update for European MediaPad M3 and today we provide you the latest Official MediaPad M3 B350 Nougat Update for the USA and the Middle East variants. The ROM packs with the latest Android 7.0 Nougat firmware which is based on the latest EMUI 5.0 OS. The update is an official Stable build and files are uploaded on official Huawei server. Here we provide you the Official MediaPad M3 B350 Nougat Update files with that you can update MediaPad M3 to EMUI 5.0 Nougat.

Huawei MediaPad M3 features an 8.4-inch display with a resolution of with 1600 x 2560 pixels. The MediaPad M3 powered by an octa-core Kirin 950 processor with 4GB of RAM. The phone has 32/64GB of internal storage which is expandable up to 256GB via a microSD card. You can Download and Install MediaPad M3 B350 Nougat Update from below which has a build number BTV-W09C128B350/BTV-DL09C199B350.

Download MediaPad M3 B350 Nougat Update [USA][Middle East]

Firmware Information –

  • Device – MediaPad M3
  • Model – BTV-W09/BTV-DL09
  • Android Version – 7.0
  • EMUI Version – 5.0
  • Firmware – B350
  • Build Number – BTV-W09C128B350/BTV-DL09C199B350
  • Region – USA/Middle East
  • Status – Official
  • Type – Full firmware image
  • What’s New – Changelogs

Note:-

  • This Firmware file is only for MediaPad M3 BTV-W09 USA/Middle-East. Don’t try this on any other device.
  • Your device must be on stock firmware and stock recovery.
  • Follow the steps correctly otherwise you may brick your device.
  • We are not responsible for any damage to your phone.
  • It may erase your data so it is advisable to take a complete backup of your phone for safer side.
  • Ensure that your phone has at least 50-60% charged to prevent the accidental shutdown in-between the process.

Download MediaPad M3 B350 Nougat Update Files

1) Nougat update for MediaPad M3 USA BTV-W09C128B350

2) Nougat update for MediaPad M3 Middle East BTV-DL09C199B350

3) Nougat Update for Huawei Mediapad M3 Russia – Download

How to Install B350 Update on MediaPad M3 –

Step 1

1) First, download MediaPad M3 B350 Update.zip from above and extract it.

2) Now create a folder dload in the root of your SD card and place the update.app file in that folder.

3) Now dial *#*#2846579#*#* from your phone dialer to open a hidden menu.

4) Now select Software Upgrade and start SDCard Upgrade.

5) Now select and run the update.

6) Wait until the installation process is complete and then reboot your device.

7) Done.

Step 2

1) Now download update_data_full_hw_xx.zip for MediaPad M3 from above and extract it.

2) Now copy all data including the update.app file in the dload folder.

3) Now dial *#*#2846579#*#* from your phone dialer to open a hidden menu.

4) Now select Software Upgrade and start SDCard Upgrade.

5) Now select and run the update.

6) Wait until the installation process is complete and then reboot your device.

7) Done.

Download and Install MediaPad M3 B350 Firmware Update and share it with your friends. If you have any questions comment below.

The post Download MediaPad M3 B350 Nougat Update [USA][Middle East] appeared first on STechGuide.

Download Xperia X Android 7.1.1 Nougat Firmware [34.3.A.0.194]

$
0
0

Now you can Update Xperia X to Android 7.1.1 Nougat by installing the latest 34.3.A.0.194 Nougat Firmware. Sony rolled out the latest 7.0 Nougat update for Xperia X and now the Latest Xperia X 34.3.A.0.194 Nougat Firmware is also available for download. The update brings June security patch alongside all Nougat Features. Download Xperia X Android 7.1.1 Nougat Firmware from below.

Here we share the latest Xperia X Android 7.1.1 Nougat FTF Firmware with that you can update Xperia X to Android 7.1.1 Nougat manually. If you want to flash 34.3.A.0.194 Nougat update on Xperia X then you are in right place here we provide you the Official Xperia X Android 7.1.1 Nougat Firmware for F5121 and F5122. Download Xperia X Nougat FTF file from below.

Download Xperia X Android 7.1.1 Nougat Firmware [34.3.A.0.194]

The Nougat 7.1.1 Update for Xperia X is available for both single and dual sim variants. You can manually check the Xperia X 34.3.A.0.194 Nougat by going to Settings -> About Phone -> Software Updates. If you won’t find the update there you can download the Android 7.1.1 Nougat firmware for Xperia X from below and update it manually. Download Xperia X Android 7.1.1 Nougat Firmware from below.

Note:-

  • This Firmware file is only for Xperia X. Don’t try this on any other device.
  • Follow the steps correctly otherwise you may brick your device.
  • We are not responsible for any damage to your phone.
  • It may erase your data so it is advisable to take a complete backup of your phone for safer side.
  • Ensure that your phone has at least 50-60% charged to prevent the accidental shutdown in-between the process.

Download Xperia X Android 7.1.1 Nougat Firmware

Xperia X (F5121)

  • Nougat FTF file for F5121 Xperia X Customized DE – Download (F5121_1303-2543_34.3.A.0.194-R5D_Customized_DE.ftf)
  • Nougat 7.1.1 FTF file for Xperia X F5121 Customized TR – Download (F5121_1302-3012_34.3.A.0.194-R3D_Customized_TR.ftf)
  • Nougat FTF file for Xperia X F5121 Customized UK – Download (F5121_1302-3903_34.3.A.0.194-R4D_Customized_UK.ftf)
  • Nougat FTF file for F5121 Xperia X Customized CH – Download (F5121_1302-8390_34.3.A.0.194-R2D_Customized_CH.ftf)
  • Nougat FTF Xperia X F5121 Customized GEL – Download (F5121_1302-6571_34.3.A.0.194-R3D_Customized_GEL.ftf)
  • Nougat FTF file for Xperia X F5121 Customized FR – Download (F5121_1302-3046_34.3.A.0.194-R3D_Customized_FR.ftf)

Xperia X (F5122)

  • Nougat FTF file for the USA Xperia X Customized US – Download (F5122_1302-7221_34.3.A.0.194-R3D_Customized_US.ftf)
  • Android Nougat FTF for Xperia X India Customized IN – Download (F5122_1302-4789_34.3.A.0.194-R5D_Customized_IN.ftf)
  • Nougat FTF file for F5122 Xperia X Customized PH – Download (F5122_1302-3404_34.3.A.0.194-R3D_Customized_PH.ftf)
  • Nougat FTF file for F5122 Xperia X Customized MEA – Download (F5122_1302-3367_34.3.A.0.194-R2D_Customized_MEA.ftf)
  • Nougat 7.1.1 FTF for F5122 Xperia X Customized SA – Download (F5122_1302-4804_34.3.A.0.194-R2D_Customized_SA.ftf)
  • Android Nougat FTF for Xperia X Customized MAA – Download (F5122_1302-5235_34.3.A.0.194-R2D_Customized_MAA.ftf)
  • Nougat FTF file for F5122 Xperia X Customized THH – Download (F5122_1302-3379_34.3.A.0.194-R3D_Customized_TH.ftf)
  • Nougat FTF file for F5122 Xperia X Customized MY – Download (F5122_1302-3405_34.3.A.0.194-R3D_Customized_MY.ftf)
  • Nougat 7.1.1 FTF for F5122 Xperia X Customized FR – Download (F5122_1302-3382_34.3.A.0.194-R2D_Customized_FR.ftf)
  • Download Sony Flash Tool

How to Flash Android 7.1.1 Nougat on Xperia X –

  1. First enable USB debugging from setting>developer option>. To enable Developer Options, go to About phone and tap the Build Number 7 times.
  2. Now download FlashTool from above and install Flashtool drivers. Go to Flashtool>Drivers>Flashtool-drivers.exe and install the Flashtool, Fastboot & Xperia drivers.
  3. Now Download Nougat 7.0 ftf File for Xperia X from above and save it on Flashtool>Firmwares folder.
  4. Now Open the Flashtool.exe
  5. Now click on click on Flash device->Flashmode and Select the FTF firmware file that you placed in the Firmware folder.
  6. Check Wipe cache, data, APPS_LOG and USERDATA if you want to perform a clean installIf you are just looking forward to the upgrade, then do not check any options.
  7. Now click on OK, and it will start preparing the firmware file for flashing. This may take a little while to load.
  8. As soon as the firmware is loaded, connect your phone via data cable. It will prompt you to attach the phone by turn off the phone and keep Volume Down key pressed and plug in the data cable.
  9. As soon as the phone detected in Flashmode, the firmware will start flashing, Do not leave the Volume Down key until the process is complete.
  10. Once the installation completes, leave the Volume Down key and boot your phone normally. You should now be on the latest Android Nougat firmware

Download Xperia X Android 7.1.1 Nougat Firmware and share it with your friends. Let us know your thoughts about Xperia X anroid 7.1.1 update in the comments below. Stay connected with us via Facebook, Twitter, and Google Plus to read more such helpful posts.

The post Download Xperia X Android 7.1.1 Nougat Firmware [34.3.A.0.194] appeared first on STechGuide.


Download Xperia X Compact Android 7.1.1 Nougat Firmware [34.3.A.0.194]

$
0
0

Latest 34.3.A.0.194 Nougat Firmware update for Xperia X Compact is now available for download. Sony rolled out the latest 7.0 Nougat update for Xperia X Compact and now the Latest Xperia X Compact 34.3.A.0.194 Nougat Firmware is also available for download. The update brings June security patch alongside all Nougat Features. Download Xperia X Compact Android 7.1.1 Nougat Firmware from below.

Here we share the latest Xperia X Compact Android 7.1.1 Nougat FTF Firmware with that you can update Xperia X Compact to Android 7.1.1 Nougat manually. If you want to flash 34.3.A.0.194 update on Xperia X Compact then you are in right place here we provide you the Official Xperia X Compact Android 7.1.1 Nougat Firmware for F5321. Download Xperia X Compact Nougat FTF file from below.

Download Xperia X Compact Android 7.1.1 Nougat Firmware [34.3.A.0.194]

The Nougat 7.1.1 Update for Xperia X Compact is available for both single and dual sim variants. You can manually check the Xperia X Compact 34.3.A.0.194 Nougat by going to Settings -> About Phone -> Software Updates. If you won’t find the update there you can download the Android 7.1.1 Nougat firmware for Xperia X Compact from below and update it manually. Download Xperia X Compact Android 7.1.1 Nougat Firmware from below.

Note:-

  • This Firmware file is only for Xperia X Compact. Don’t try this on any other device.
  • Follow the steps correctly otherwise you may brick your device.
  • We are not responsible for any damage to your phone.
  • It may erase your data so it is advisable to take a complete backup of your phone for safer side.
  • Ensure that your phone has at least 50-60% charged to prevent the accidental shutdown in-between the process.

Download Xperia X Compact Android 7.1.1 Nougat Firmware

Xperia X Compact (F5321)

  • Nougat FTF file for F5321 Xperia X Compact Customized DE – Download (F5321_1305-6830_34.3.A.0.194-R4D_Customized_DE.ftf)
  • Nougat 7.1.1 FTF file for Xperia X Compact F5321 Customized GR – Download (F5321_1305-0028_34.3.A.0.194-R3D_Customized_GR.ftf)
  • Nougat FTF file for Xperia X Compact F5321 Customized UK – Download (F5321_1304-8441_34.3.A.0.194-R2D_Customized_UK.ftf)
  • Nougat FTF file for F5321 Xperia X Compact Customized CH – Download (F5321_1305-0029_34.3.A.0.194-R4D_Customized_CH.ftf)
  • Nougat FTF Xperia X Compact F5321 Customized GEL – Download (F5321_1305-2001_34.3.A.0.194-R2D_Customized_GEL.ftf)
  • Nougat FTF file for Xperia X Compact F5321 Customized TR – Download (F5321_1304-8437_34.3.A.0.194-R3D_Customized_TR.ftf)
  • Nougat FTF file for the USA Xperia X Compact Customized US – Download (F5321_1304-3880_34.3.A.0.194-R3D_Customized_US.ftf)
  • Android Nougat FTF for Xperia X Compact Customized ZA – Download (F5321_1305-1326_34.3.A.0.194-R4D_Customized_ZA.ftf)
  • Nougat FTF file for F5321 Xperia X Compact Customized IL – Download (F5321_1305-0657_34.3.A.0.194-R2D_Customized_a_IL.ftf)
  • Nougat FTF file for F5321 Xperia X Compact Customized MEA – Download (F5321_1304-8435_34.3.A.0.194-R2D_Customized_MEA.ftf)
  • Nougat 7.1.1 FTF for F5321 Xperia X Compact Customized SA – Download (F5321_1304-9008_34.3.A.0.194-R2D_Customized_SA.ftf)
  • Android Nougat FTF for Xperia X Compact Customized MAA – Download (F5321_1304-9007_34.3.A.0.194-R2D_Customized_MAA.ftf)
  • Nougat FTF file for F5321 Xperia X Compact Customized SG – Download (F5321_1304-8438_34.3.A.0.194-R3D_Customized_SG.ftf)
  • Android 7.1.1 Nougat Firmware Update for Xperia A – Download

How to Flash Android 7.1.1 Nougat on Xperia X Compact –

  1. First enable USB debugging from setting>developer option>. To enable Developer Options, go to About phone and tap the Build Number 7 times.
  2. Now download FlashTool from above and install Flashtool drivers. Go to Flashtool>Drivers>Flashtool-drivers.exe and install the Flashtool, Fastboot & Xperia drivers.
  3. Now Download Nougat 7.0 ftf File for Xperia X Compact from above and save it on Flashtool>Firmwares folder.
  4. Now Open the Flashtool.exe
  5. Now click on click on Flash device->Flashmode and Select the FTF firmware file that you placed in the Firmware folder.
  6. Check Wipe cache, data, APPS_LOG and USERDATA if you want to perform a clean installIf you are just looking forward to the upgrade, then do not check any options.
  7. Now click on OK, and it will start preparing the firmware file for flashing. This may take a little while to load.
  8. As soon as the firmware is loaded, connect your phone via data cable. It will prompt you to attach the phone by turn off the phone and keep Volume Down key pressed and plug in the data cable.
  9. As soon as the phone detected in Flashmode, the firmware will start flashing, Do not leave the Volume Down key until the process is complete.
  10. Once the installation completes, leave the Volume Down key and boot your phone normally. You should now be on the latest Android Nougat firmware

Download Xperia X Compact Android 7.1.1 Nougat Firmware and share it with your friends. Let us know your thoughts about Xperia X Compact Android 7.1.1 update in the comments below. Stay connected with us via Facebook, Twitter, and Google Plus to read more such helpful posts.

The post Download Xperia X Compact Android 7.1.1 Nougat Firmware [34.3.A.0.194] appeared first on STechGuide.

Download MIUI 8.5.1.0 Global Stable ROM for Redmi Note 3

$
0
0

Latest MIUI 8.5.1.0 Global Stable ROM for Redmi Note 3 Snapdragon variant is rolling out via OTA. The update is Beta stable version and rolled out for selected users. The current stable version for the device is MIUI 8.2.4.0 but if you want early access to the new update then you can download MIUI 8.5.1.0 update for Redmi Note 3 Kenzo from below and flash it manually. The update brings many new features and fixes. We share a direct link to download MIUI 8.5.1.0 Global Stable ROM for Redmi Note 3.

The new update is rolling out via OTA and brings all MIUI 8.2 Features and improvements. You can download the latest version of MIUI 8.5.1.0 for Redmi Note 3 from below. The new update is MIUI 8.5.1.0 and rolled out via OTA (over-the-air), and users will receive the Notification pop up once the update is ready for download and install. Download MIUI 8.5.1.0 Global Stable ROM for Redmi Note 3 from below. You can also MIUI 8.2 for other Xiaomi Devices.

Download MIUI 8.5.1.0 Global Stable ROM for Redmi Note 3

You can Download Redmi Note 3 MIUI 8.5.1.0 ROM from below and also manually check for the update by going to Settings -> About Phone -> System updates -> Check for update. So check for the OTA to or Download MIUI 8.5.1.0 Update for Redmi Note 3 and install it manually.

Download MIUI 8.5.1.0 Global Stable ROM for Redmi Note 3

  • MIUI 8.2.4.0 to MIUI 8.5.1.0 OTA for Redmi Note 3 – Coming Soon.
  • MIUI 8.5.1.0 Update for Redmi Note 3 (Recovery ROM) – Download
  • MIUI 8.5.1.0 Full ROM for Redmi Note 3 (Fastboot ROM) – Coming Soon

How to Install MIUI 8.5.1.0 Stable ROM on Redmi Note 3 –

To install MIUI v8.5.1.0 for Redmi Note 3 from above either Recovery ROM or Fastboot ROM and use the below method to install thin on your device.

Flash MIUI 8.5.1.0 on Redmi Note 3 (Recovery and Fastboot)

Download the latest MIUI 8.5.1.0 Global Stable ROM for Redmi Note 3 and flash it. Comment below if you have any doubts.

The post Download MIUI 8.5.1.0 Global Stable ROM for Redmi Note 3 appeared first on STechGuide.

Download MIUI 8.5.1.0 Global Stable ROM for Redmi 3/Prime

$
0
0

Latest MIUI 8.5.1.0 Global Stable ROM for Redmi 3/Prime ido is rolling out via OTA. The update is Beta stable version and rolled out for selected users but if you want early access to the new update then you can download MIUI 8.5.1.0 update for Redmi 3/Prime from below and flash it manually. The update brings many new features and fixes. We share a direct link to download MIUI 8.5.1.0 Global Stable ROM for Redmi 3/Prime

The new update is rolling out via OTA and brings all MIUI 8.2 Features and improvements. You can download the latest version of MIUI 8.5.1.0 for Redmi 3/Prime from below. The new update is MIUI 8.5.1.0 and rolled out via OTA (over-the-air), and users will receive the Notification pop up once the update is ready for download and install. Download MIUI 8.5.1.0 Global Stable ROM for Redmi 3s/Prime from below. You can also MIUI 8.2 for other Xiaomi Devices.

Download MIUI 8.5.1.0 Global Stable ROM for Redmi 3/Prime

You can Download Redmi 3/Prime MIUI 8.5.1.0 ROM from below and also manually check for the update by going to Settings -> About Phone -> System updates -> Check for update. So check for the OTA to or Download MIUI 8.5.1.0 Update for Redmi 3/Prime and install it manually.

Download MIUI 8.5.1.0 Global Stable ROM for Redmi 3/Prime

  • MIUI 8.2.1.0 to MIUI 8.5.1.0 OTA for Redmi 3/Prime – Coming Soon
  • MIUI 8.5.1.0 Update for Redmi 3/Prime (Recovery ROM) – Download
  • MIUI 8.5.1.0 Full ROM for Redmi 3/Prime (Fastboot ROM) – Coming Soon

How to Install MIUI 8.5.1.0 Stable ROM on Redmi 3/Prime –

To install MIUI v8.5.1.0 for Redmi 3/Prime from above either Recovery ROM or Fastboot ROM and use the below method to install thin on your device.

Flash MIUI 8.5.1.0 on Redmi 3/Prime (Recovery and Fastboot)

Download the latest MIUI 8.5.1.0 Global Stable ROM for Redmi 3/Prime and flash it. Comment below if you have any doubts.

The post Download MIUI 8.5.1.0 Global Stable ROM for Redmi 3/Prime appeared first on STechGuide.

Download and Install Nougat Based MIUI 8.5.1.0 for Mi Max

$
0
0

Greetings for Mi Max Users Xiaomi released the latest Android Nougat Based MIUI 8.5 Global Stable ROM for Mi Max. The update is a Beta Stable version and rolling out via OTA also we share a direct link to download MIUI 8.5.1.0 for Mi Max. The new update rolling out via OTA and brings all MIUI 8.2 Features and improvements. Nougat based MIUI 8.5.1.0 Global Stable ROM for Mi Max released and you can download the latest version of MIUI 8.5.1.0 for Mi Max from below. Download Nougat Based MIUI 8.5 for Mi Max from below. You can also MIUI 8.2 for other Xiaomi Devices.

Xiaomi recently rolled out the MIUI 8.5.1.0 for many devices and now releases the update MIUI 8.5.1.0 for Xiaomi Mi Max. Here we provide you the Full MIUI 8.5.1.0 Stable ROM for Mi Max. The Nougat update was already rolled out for Mi Max users as a beta test but now stable Nougat based MIUI 8.5.1.0 Update for Mi Max starts rolling out. You can wait for the OTA updates, or you can update Mi Max to MIUI 8.5.1.0 manually.

Download and Install Nougat Based MIUI 8.5.1.0 for Mi Max

You can Download Mi Max MIUI 8.5.1.0 ROM from below and also manually check for the update by going to Settings -> About Phone -> System updates -> Check for update. So check for the OTA to or Download MIUI 8.5.1.0 for Mi Max and install it manually.

Download Nougat Based MIUI 8.5.1.0 for Mi Max

  • MIUI 8.5.1.0 Update for Mi Max (Recovery ROM) – Download
  • MIUI 8.5.1.0 Full ROM for Mi Max (Fastboot ROM) – Coming Soon

How to Install MIUI 8.5.1.0 Global Stable ROM on Mi Max –

To install MIUI v8.5.1.0 for Xiaomi Mi Max from above either Recovery ROM or Fastboot ROM and use the below method to install thin on your device.

Flash MIUI 8.5 on Mi Max (Recovery and Fastboot)

Download latest Nougat Based MIUI 8.5.1.0 for Mi Max and flash it. Comment below if you have any doubts.

The post Download and Install Nougat Based MIUI 8.5.1.0 for Mi Max appeared first on STechGuide.

Download Android 7.1.1 based MIUI 8.5.10.0 Stable ROM for Mi Max 2

$
0
0

Latest MIUI 8.5.10.0 China Stable ROM for Mi Max 2 is now available for download. This is the very first version of MIUI ROM released for Mi Max 2. So good news for users who want to tweak their phone but afraid something happens to their phone. Now they can Download Mi Max 2 Stock Firmware to restore their phone. Here we provide you the full MIUI 8.5.10.0 Stable ROM for Mi Max 2 Android 7.1.1 based, which can be flashed via Recovery or Fastboot.

Installing a stock firmware on Mi Max 2 is good because in case you mess up during root, installing TWRP, Xposed or tweaking your phone. In case you soft bricked your device or facing the bootloop issue or experience heavy lags, then you should download and Flash Stock Firmware of Mi Max 2. Today we provide you the link to Download MIUI 8.5.10.0 Stable ROM for Mi Max 2 which can be flashed manually.

Download Android 7.1.1 based MIUI 8.5.10.0 Stable ROM for Mi Max 2

This is the first version of MIUI China Stable ROM and we hope Global Stable ROM for Mi Max 2 will be available soon. We will provide you all further updates and rooting guide or any other guides related to Mi Max 2. For now, you can Download Mi Max 2 MIUI 8.5.10.0 ROM from below and also manually check for the update next times by going to Settings -> About Phone -> System updates -> Check for update. So Download MIUI 8.5.10.0 Update for Mi Max 2 and install it manually.

Download MIUI 8.5.10.0 Stable ROM for Mi Max 2

How to Install MIUI 8.5.10.0 on Mi Max 2 –

To install MIUI 8.5.10 on Mi Max 2 first download the ROM from above either Recovery ROM or Fastboot ROM and use the below method to install it on your device.

Flash MIUI 8.5.10.0 on Mi Max 2 (Recovery and Fastboot)

Download MIUI 8.5.10.0 Stable ROM for Mi Max 2 and flash it. Comment below if you have any doubts.

The post Download Android 7.1.1 based MIUI 8.5.10.0 Stable ROM for Mi Max 2 appeared first on STechGuide.

Download Huawei P8 B399 Marshmallow Update [Vodafone][Europe]

$
0
0

Latest B399 Update for Huawei P8 starts rolling out. The update adds new features to apps, including Email, Calendar, and Notepad, and optimizes the Themes icon. Earlier we posted the B398 update for European Huawei P8 and today we provide you the Official Huawei P8 B399 Marshmallow Update for Vodafone GRA-L09 variants. If you want to Install B399 Update on Huawei P8, then you are in right place. Here we provide you the Official Huawei P8 B399 Marshmallow Update files.

Huawei P8 features a 5.2 inches display with a resolution of 1080 x 1920 and a pixel density of 424ppi. Huawei P8 powered by Octa core HiSilicon Kirin 930/935 processor with 3GB of RAM and 16/64GB internal storage. Now you can download the latest B399 OTA for Huawei P8. You can Download and Install B399 Update on Huawei P8 from below which has a build number GRA-L09C10B399.

Download Huawei P8 B399 Marshmallow Update [Vodafone][Europe]

Firmware Information –

  • Device – Huawei P8
  • Model – GRA-L09
  • Android Version – 6.0
  • EMUI Version – 4.0
  • Firmware – B399
  • Build Number – GRA-L09C02B398
  • Region – Europe
  • Status – Official
  • Type – Full firmware image
  • What’s New – Changelogs

Note:-

  • This Firmware file is only for Huawei P8 GRA-L09C02 Variants. Don’t try this on any other device.
  • Your device must be on stock firmware and stock recovery.
  • Follow the steps correctly otherwise you may brick your device.
  • We are not responsible for any damage to your phone.
  • It may erase your data so it is advisable to take a complete backup of your phone for safer side.
  • Ensure that your phone has at least 50-60% charged to prevent the accidental shutdown in-between the process.

Download Huawei P8 B399 Marshmallow Update File

Download B399 update for Huawei P8

How to Install B399 Update on Huawei P8 –

Method 1

1) First, download Full B399 ROM for Huawei P8 from above and extract it.

2) Now create a folder dload in the root of your SD card and place the update.app file in that folder.

3) Now dial *#*#2846579#*#* from your phone dialer to open a hidden menu.

4) Now click on Project Menu -> Software Upgrade -> SDCard Upgrade.

5) Now select and run the update.

6) Wait until the installation process is complete and then reboot your device.

7) Done.

Method 2

1) Download Stock B399 update for Huawei P8 from above and extract it.

2) Now create a folder dload in the root of your SD card and place the update.app file in that folder.

3) Now turn off your device.

4) Now press “Volume Up + Volume Down and Power Button” together. The update process will start automatically.

5) Now wait for some time to complete the process.

6) Done.

Download and Install Huawei P8 B399 Marshmallow Update and share it with your friends. If you have any questions comment below.

The post Download Huawei P8 B399 Marshmallow Update [Vodafone][Europe] appeared first on STechGuide.

Download Huawei P9 B388 Nougat Update [Europe]

$
0
0

Here we share the official link to Download Huawei P9 B388 Nougat Update for Europe. Earlier we posted the B387 Nougat update for Huawei P9 and now you can Download and Install B388 Nougat Update on Huawei P9. The update improves system security with Google security patches and based on Android 7.0 with company’s EMUI 5.0. Download Huawei P9 B388 Nougat Update from below.

Huawei P9 features a 5.2 inches display with a resolution of 1080 x 1920 and a pixel density of 423ppi. Huawei P9 powered by Octa core HiSilicon Kirin 955 processor with 4GB of RAM and 64GB internal storage. Follow the below steps to Download Huawei P9 B388 Nougat Update.

Download Huawei P9 B388 Nougat Update [Europe]

Firmware Information –

  • Device – Huawei P9
  • Model – EVA-L09
  • Android Version – 7.0
  • EMUI Version – 5.0
  • Firmware – B388
  • Build Number – EVA-L09C432B388
  • Region – Europe
  • Status – Official
  • Type – Full firmware image
  • What’s New – Changelogs

Note:-

  • This Firmware file is only for Huawei P9 Europe. Don’t try this on any other device.
  • Your device must be on stock firmware and stock recovery.
  • Follow the steps correctly otherwise you may brick your device.
  • We are not responsible for any damage to your phone.
  • It may erase your data so it is advisable to take a complete backup of your phone for safer side.
  • Ensure that your phone has at least 50-60% charged to prevent the accidental shutdown in-between the process.

Download Huawei P9 B388 Nougat Update File

1) Nougat update for European Huawei P9 EVA-L09C432B388

How to Install B388 Nougat Update on Huawei P9 –

Dload method is not tested and not recommended for now but we will provide you the Huawei P9 Nougat dload file as soon as its available. If you are a stock user then you can try updating via Firmware Finder. Rooted users follow below steps.

1) First, you need to unlock the bootloader of Huawei P9 and download and install a custom recovery. If you already had an unlocked bootloader and custom recovery installed on your device then skip this step.

2) Download Huawei P9 B388 Nougat files from above and save it on your device.

3) Now Boot your device into TWRP Recovery mode.

5) In TWRP first flash the update.zip file and once done without rebooting your device move to the next step.

6) Now flash the update_full_EVA-L09_hw_eu.zip and update_data_full_public.zip files.

7) wait until the process finish.

8) Done! Reboot your device and enjoy.

Download Huawei P9 B388 Nougat Update for Europe and share it with your friends. If you have any questions comment below. Stay connected with us via Facebook, Twitter, and Google Plus to read more such helpful posts.

The post Download Huawei P9 B388 Nougat Update [Europe] appeared first on STechGuide.


How to Unlock Bootloader of OnePlus 5

$
0
0

The OnePlus recently launched its new flagship device OnePlus 5, which comes with a locked bootloader. But with few simple steps, you can Unlock Bootloader of OnePlus 5. If you decide to flash a ROM, root your phone, or to install a custom recovery, then you need to unlock the bootloader of OnePlus 5 first. But you should be warned that unlocking OnePlus 5 bootloader may void its warranty. Follow the below guide to Unlock Bootloader of OnePlus 5.

If you’re planning to install a custom ROM or want to root your phone, you have to unlock the bootloader of OnePlus 5 first. Once you unlock OnePlus 5 bootloader, you can root and install a custom recovery on your phone. So here is the step by step guide with the help of that you can quickly unlock bootloader of OnePlus 5. Read the below note carefully before you unlock the bootloader of OnePlus 5.

How to Unlock Bootloader of OnePlus 5

Note:-

  • Follow the steps correctly otherwise you may brick your device. We are not responsible for any damage to your phone.
  • It will erase all your personal data including data of internal storage, so we advise you first to take a complete backup of your phone and then proceed.
  • Ensure that your phone has at least 50-60% charged to prevent the accidental shutdown in-between the process.

How to unlock bootloader of OnePlus 5 –

1) First, enable ‘USB debugging’ and OEM Unlock’ option from setting>developer option>. To enable Developer Options, go to About phone and tap the Build Number 7 times.

Usb debugging and OEM Unlocking
2) Install the ADB and fastboot driver for windows or ADB and Fastboot for Mac and then restart if you already have the driver installed then skip this step.

3) After installation of the driver, you can see a folder named ADB in your installation directory. Enter the folder, and you find four files including ADB and fastboot.exe.

fastboot
4) Now press and hold ‘shift’ key and right-click anywhere in the folder and select ‘Open command window here’.

fastboot cmd

5) Now connect your device to PC and enter into the fastboot mode. To enter the fastboot mode of OnePlus 5 type the below command.

adb reboot bootloader

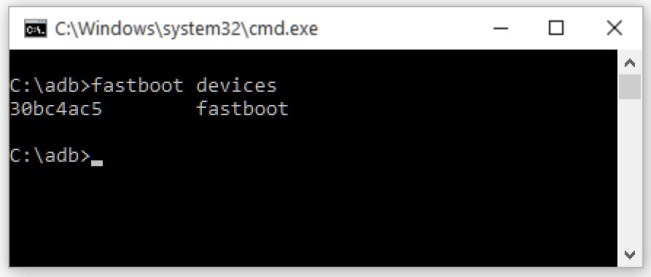
6) You are in a Fastboot mode now to check your connection by entering below command in command prompt. It will return your device serial number means your device properly connected. Check your driver if the above command is not responding.

fastboot devices

How to unlock bootloader of nexus 6p

7) To unlock bootloader of OnePlus 5, go to the command line and type below command. It will only take seconds to complete the process.

fastboot oem unlock

fastboot2
8) Above step will unlock the bootloader of OnePlus 5. Now your device will reboot.


This is the complete guide on how to unlock bootloader of OnePlus 5. If you have any doubt related to above process comment below. Stay connected with us via Facebook, Twitter, and Google Plus to read more such helpful posts.

The post How to Unlock Bootloader of OnePlus 5 appeared first on STechGuide.

How to Install TWRP Recovery and Root OnePlus 5

$
0
0

Now you can easily Install TWRP Recovery and Root OnePlus 5. The OnePlus 5 is the latest flagship device which launched recently. The phone already available in the market and if you bought the phone and looking for a way to Root OnePlus 5 then you are in the right place. Here we share how to Install TWRP Recovery and Root OnePlus 5.

First, you need to install TWRP Recovery on OnePlus 5 and then flash SuperSu to Root OnePlus 5. Recently, TWRP recovery got updated with material designed to TWRP 3.1.0. That means you can install the latest TWRP 3.1.0 on OnePlus 5. Follow this guide to Install TWRP Recovery and Root OnePlus 5.

How to Install TWRP Recovery and Root OnePlus 5

Thanks to the XDA Senior Member xdvs23 who share the unofficial TWRP for OnePlus 5. So here is the step by step guide to Root and Install TWRP Recovery on OnePlus 5. Read the below note carefully before you Install TWRP Recovery and Root OnePlus 5. Also, Check OnePlus 5 Stock Wallpapers.

Some benefits of Rooting –

  • You can install custom ROM and custom kernel on your device for faster and better performance.
  • Block Ads in apps with the help of ad blocker.
  • After you root OnePlus 5 and install TWRP on it, you can customize your device
  • Increase performance and battery life by killing background process automatically.
  • You can use Titanium Backup to restore all of your apps and data.
  • You can uninstall bloatware (Pre-installed Apps)

Note:-

  • First you need to Unlock the bootloader of OnePlus 5. (Check How to unlock Bootloader of OnePlus 5)
  • Follow the steps correctly otherwise you may brick your device. We are not responsible for any damage to your phone.
  • It will erase all your personal data including data of internal storage, so we advise you first to take a complete backup of your phone and then proceed.
  • Ensure that your phone has at least 50-60% charged to prevent the accidental shutdown in-between the process.

Files required to Root and Install Custom Recovery on OnePlus 5 –

How to Install TWRP Recovery and Root OnePlus 5

Install TWRP on OnePlus 5 –

1) First enable USB debugging from setting>developer option>. To enable Developer Options, go to About phone and tap the Build Number 7 times.

Usb debugging and OEM Unlocking

2) Now go to installation directory open ADB folder and open the command window thereby pressing and hold the ‘shift’ key and right-clicked anywhere in that folder.

cmd 6

3) Now connect your phone to PC and reboot the device into fastboot mode by typing

adb reboot bootloader

4) You are in Fastboot mode now to check your connection by entering below command in command prompt. It will return your device serial number means your device properly connected. Check your driver if the above command is not responding.

fastboot devices

How to root k3 note

5) Type the below command correctly in command prompt and then press enter. It will install TWRP recovery on OnePlus 5

fastboot flash recovery recovery.img

fastboot recoveery

6) Now boot into recovery by using the Power+Volume Down button or use the below command.

fastboot boot recovery.img

Root and Install custom Recovery on Lenovo A6000 Plus

7) Now follow below steps without leaving TWRP.

Root OnePlus 5 –

1) With above command your phone boot into the recovery mode.

2) Now select your preferred Language and set it to what you want, tap “Never show this screen on boot again”, and Swipe allow modification.


3) Now from the main menu navigate to Install Zip and select ‘no-verity-opt-encrypt-5.1.zip’. (If internal memory does not show up then Go to “Wipe” section and tap “Format Data”, and type “yes” and transfer the no-verity-opt-encrypt-5.1.zip and SuperSu via MTP)

9) Swipe to flash no-verity-opt-encrypt-5.1.zip and after that flash SuperSu. That’s it, your OnePlus 5 root successfully.

So this is the complete guide of how to Install TWRP Recovery and Root OnePlus 5 with easy steps. If you have any questions, then comment below. Stay connected with us via Facebook, Twitter, and Google Plus to read more such helpful posts.

The post How to Install TWRP Recovery and Root OnePlus 5 appeared first on STechGuide.

Download OxygenOS 4.5.2 for OnePlus 5 [Android 7.1.1]

$
0
0

OnePlus starts rolling out OxygenOS 4.5.2 update for OnePlus 5. OnePlus 5 announced recently and they already released the new update for the device which fixes few bugs and optimized some apps. The OxygenOS 4.5.2  for OnePlus 5 rolling out via OTA and soon will be available for all. Download OxygenOS 4.5.2 for OnePlus 5 from below.

The update is rolling out via OTA (over-the-air) and many users already getting OxygenOS 4.5.2 for OnePlus 5. The update is incremental and rolls out in phase wise manner. You can wait for the OTA updates, or you can Update Oneplus 5 to OxygenOS 4.5.2 manually with below method. Download OxygenOS 4.5.2 for OnePlus 5 from below.

Download OxygenOS 4.5.2 for OnePlus 5 [Android 7.1.1]

The new OxygenOS 4.5.2 for OnePlus 5 fixes few bugs and optimized some apps (Check the complete changelogs from below). We provide you the OxygenOS 4.5.2 OTA file which you can flash on your device. So if you want to update your OnePlus to the latest version then Download OxygenOS 4.5.2 for OnePlus 5 from below. Check below what’s new in OxygenOS 4.5.2

OxygenOS 4.5.2 Features and Changelogs –

  • Bug fixes:
    • App installation issue
    • System update failure
  • Optimizations:
    • Camera
    • BT Stability
    Network Stability
    • System Stability
    • Compatibility with 3rd party apps

Note:-

  • This method is only for the OnePlus 5.
  • Full ROM can be flashed via TWRP as well.
  • Follow the steps correctly otherwise you may brick your device. We are not responsible for any damage to your phone.
  • It will not erase your data, but still, we advise you to take a complete backup of your phone and then proceed.
  • Ensure that your phone has at least 50-60% charged to prevent the accidental shutdown in-between the process.

Download OxygenOS 4.5.2 for OnePlus 5

How to Install OxygenOS 4.5.2 Update on OnePlus 5

For Non-Rooted Users

Method 1

1) Enable ‘USB debugging’ option from setting>developer option>. To enable Developer Options, go to About phone and tap the Build Number 7 times.

3) Download ADB and fastboot driver for windows orADB and Fastboot for Mac and install it on your PC.

4) Download the OxygenOS 4.5.2 for OnePlus 5 from above Copy ROM to a folder where adb installed.

5) Now Turn Off your phone and boot into recovery mode.

3) Choose Install from ADB Sideload

4) Now Connect your phone to Laptop/PC

5) On ADB folder press shift+right click and click on open command here.

6) Now check your connection by typing the below command

adb devices

if your device is listed, you’re ready to flash the ROM

7) Flash the Oxygen OS 4.5.2 on OnePlus 5 by typing below command

adb sideload File Name.zip

8) Now wait until the process complete and then Reboot the phone.

9) Done!

Method 2

1) Download OxygenOS 4.5.2 OTA zip file from above and save it on your internal phone memory.

2) Now Go to Settings > System Updates > Settings Icon > Local Upgrade & Select the OTA File.

3) Select upgrade now when the system prompts.

4) Now your device will reboot into stock recovery and flash the OTA.

5) The installer will flash the OTA itself and reboot the device.

6) Done.

For Rooted Users

1) First Unlock your device bootloader and Install TWRP on your Device. Skip this step if already installed TWRP.

2) Reboot your device into Recovery mode and create a Nandroid backup (Recommended) of your device for safer side, if anything goes wrong.

3) Now wipe your cache files by Goto Wipe>Advanced Wipe>Select Wipe cache and Dalvik cache and swipe to confirm it.

4) Now, Go to Install and locate the OOS 4.5.2 Full Rom Zip & swipe to Install the ROM file

5) Now Flash the Magisk Or SuperSU again to maintain the root (Optional).

6) Wipe Dalvik & Cache again.

7) Done! Reboot System and Enjoy.

That’s all this is the complete guide to Download OxygenOS 4.5.2 for OnePlus 5. Have any questions? Do let us know that in the comments below. Stay connected with us via Facebook, Twitter, and Google Plus to read more such helpful posts.

Source – XDA

The post Download OxygenOS 4.5.2 for OnePlus 5 [Android 7.1.1] appeared first on STechGuide.

Lenovo K6 Power Android 7.0 Nougat Update Starts Rolling Out

$
0
0

Good news for Lenovo K6 Power users, Company has started rolling out Android 7.0 Nougat update for Lenovo K6 Power in India which is around 1.6GB with build K33_S222_170523_ROW. The update is rolling out via OTA (over-the-air) and the notification will pop up on users device once the update is ready for download and install. Many users across the country have confirmed that they have received the update. You can check Lenovo K6 Power Android 7.0 Nougat Update on your device by heading to settings, about and hit system update, check if there is any update available, if yes, update it.

If you are a Lenovo K6 Power user just head to settings to check for the update or you can wait for some time, we will provide you the Nougat OTA file with that you can Update Lenovo K6 Power to Android Nougat manually. Nougat Update for Lenovo K6 Power is based on Android 7.0.

Lenovo K6 Power Android 7.0 Nougat Update Starts Rolling Out

The new Android 7.0 Nougat update for Lenovo K6 Power packed with all Nougat Features and will work on stock devices (Non-Rooted). You can check the infographics of best Android Nougat Features. The Lenovo K6 Power Android 7.0 Nougat Update is available via OTA (over-the-air), and it is about 1557MB in size with build number K33_S156_170220_ROW to K33_S222_170523_ROW. The update may wipe SD Card data, so it is advisable to take a backup before you Update Lenovo K6 Power to Nougat.

Note: – Make sure you at least 2GB of free space on your device and battery level should be 75% before you Update Lenovo K6 Power to Nougat. It is recommended to take backup of your device and do a factory reset after installing the update as many users post they faced forced closed error.

Lenovo K6 Power features a 5.0-inch Full HD Display and is powered by 2 GHZ Snapdragon 430 Processor with 3GB/4GB of RAM and 16GB of internal storage.Camera wise, the Lenovo K6 Power has a 13MP rear camera with LED flash along with an 8MP front-facing snapper. The phone runs on Android Marshmallow, but now you can Download and Install Android 7.0 Nougat on Lenovo K6 Power.

Lenovo k6 power nougat update

How to Manually Check Lenovo K6 Power Android 7.0 Nougat Update –

The update will gradually spread in phase wise manner. There is no particular date when you get the update. It could be today or could be next week. To check Nougat update for Lenovo K6 Power manually head over to the Settings-> About device -> Software update. 

The Nougat OTA file for Lenovo K6 Power is not available for now, but we will provide it soon so you can Update Lenovo K6 Power to Nougat manually. Let us know your experience if you receive the update. Stay connected with us via Facebook, Twitter, and Google Plus to read more such helpful posts.

The post Lenovo K6 Power Android 7.0 Nougat Update Starts Rolling Out appeared first on STechGuide.

Download and Install Hydrogen OS 3.5 on OnePlus 5

$
0
0

Now you can Download Hydrogen OS 3.5 for OnePlus 5, Which is based on latest Android 7.1 Nougat. Recently OnePlus released the Oxygen OS 4.5.2 update for OnePlus 5, but if are a HydrogenOS fan then should download Hydrogen OS 3.5 for OnePlus 5. H2OS 3.5 is a first the first version released for OnePlus 5. The Hydrogen OS is designed for the Chinese variants, but you can also install H2OS 3.5 on a regular or international variant of the OnePlus 5. Follow the below steps to Download and Install Hydrogen OS 3.5 on OnePlus 5.

Hydrogen OS 3.5 for OnePlus 5 is released for China and maintained only in China. For other countries, the company provides Oxygen OS. HydrogenOS is a featured pack ROM but comes with lots of Chinese bloatware, also the ROM won’t come with Google Play Store Pre-Installed. Still if you love the H2OS then Download and Install Hydrogen OS 3.5 on OnePlus 5 from below.

Download and Install Hydrogen OS 3.5 on OnePlus 5

Note:-

  • Follow the steps correctly otherwise you may brick your device. We are not responsible for any damage to your phone.
  • It may erase all your data, so we advise you first to take a complete backup of your phone and then proceed.
  • Ensure that your phone has at least 50-60% charged to prevent the accidental shutdown in-between the process.

Download HydrogenOS 3.5 for OnePlus 5 – 

How to Install Hydrogen OS 3.5 on OnePlus 5

For Non-Rooted Users

Method 1

1) Download the H2OS 3.5 Zip file from above and save it in your Internal Storage.

2) Turn off your device and Boot into the Recovery mode by press and hold “Volume Down+Power Button

3) Now Wipe data and cache if you want a clean installation otherwise skip this step.

4) Now in Recovery select your preferred language and select Install from Local.

5) Now select the Zip and Click on Install to start the process.

6) Now wait until the installation complete and then Reboot your device.

7) Done.

Method 2

1) Download HydrogenOS 3.5 OTA zip file from above and save it on your internal phone memory.

2) Now Go to Settings > System Updates > Settings Icon > Local Upgrade & Select the OTA File.

3) Select upgrade now when the system prompts.

4) Now your device will reboot into stock recovery and flash the OTA.

5) The installer will flash the OTA itself and reboot the device.

6) Done.

Rooted Users

1) First make sure you have TWRP Recovery installed.

2) Download the HydrogenOS 3.5 full ROM from above and save it on your phone internal memory.

3) Now Reboot your phone into Recovery Mode (TWRP) & Take a Nandroid backup (Recommended).

4) Go to Wipe -> Advance Wipe -> Select Dalvik and Cache & Swipe to Wipe.

5) Now go back and click on Install Menu and Select HydrogenOS Rom Zip file.

6) Swipe to Flash the ROM and Wipe Dalvik & Cache again.

7) To maintain root Flash SuperSU.

8) Done.

This is the complete guide to Download and Install Hydrogen OS 3.5 on OnePlus 5. If you have any questions, comment below. Stay connected with us via Facebook, Twitter, and Google Plus to read more such helpful posts.

The post Download and Install Hydrogen OS 3.5 on OnePlus 5 appeared first on STechGuide.

Viewing all 2823 articles
Browse latest View live